UNIHIKER K10 Lesson 3: Build Portable Walkman-Style Music Player (KS3/CSTA/DigComp)

Ready to go beyond Micro:bit? In this project, we will build a retro Walkman music player using Mind+ graphical coding and UNIHIKER K10. Students can master tactile button controls (short-press to skip tracks, long-press to record), multi-song playback, and dynamic playlist management - all with built-in hardware and no soldering required. Perfect for next-step learners.

Objectives
This project will simulate the interface of a portable music player on the UNIHIKER K10 by displaying text and images. We will use the onboard speaker and microphone to enable music playback and recording. The features include: short pressing the A button to move the red box and select a song; short pressing the B button to play the selected song; and long pressing the A button to record and save the audio file. The screen display effect is shown in the image.

Knowledge Goals
1. Learn the logic for distinguishing between short and long presses.
2. Master the usage of audio recording and playback commands.
3. Master the use of functions.
4. Learn more about using operators in commands.
Materials List:
Hardware:


Basic Mind+ Software Usage
1. Open Mind+ and switch to offline mode.

2. Load UNIHIKER K10
Based on the previous steps, then click on "Extensions" find the "UNIHIKER K10" module under the "Board" and click to add it. After clicking "Back" you can find the UNIHIKER K10 in the "Command Area" and complete the loading of UNIHIKER K10.

3. Connect UNIHIKER K10
First of all, you need to use a USB cable to connect the UNIHIKER K10 to the computer.

Then, after clicking Connect Device, click COM7-UNIHIKER K10 to connect.

Note: The device name of different UNIHIKER K10 may vary, but all end with K10.
In Windows 10/11, the UNIHIKER K10 is driver-free. However, for Windows 7, manual driver installation is required: https://www.unihiker.com/wiki/K10/faq/#high-frequency-problem
Hands-on Practice
Now let’s get started with the tasks. We will begin with basic button operations and gradually learn how to record and play audio on the UNIHIKER K10. Finally, we will use functions to create a portable music player.
Task 1: Button Usage — Short Press and Long Press
In this part, we will learn how to use buttons for short and long presses to display text and images on the UNIHIKER K10 screen.
Task 2: Audio Recording and Playback
In this part, we will learn how to perform audio recording and playback. We will use button controls to implement basic recording and playback operations.
Task 3: Playback of Multiple Audio Files
In this part, we will learn the logic for switching between multiple audio files, enabling the playback of multiple songs. At the same time, we will briefly learn about function modules to make the code more organized.
Task 4: Implementing a Portable Music Player
In this part, we will combine the content from Task 2 and Task 3 to implement the functionality of adding recorded files to a playlist and playing them, thus completing the portable music player.
Task 1: Button Usage — Short Press and Long Press
To implement the functionality where a short press of the A key moves the red square and a long press of the A key records audio in the portable music player, let's first understand the onboard buttons of the UNIHIKER K10 and the two key press control methods—short press and long press—and how to program these behaviors.
1. Understanding the Buttons
The UNIHIKER K10 has two buttons on the right side of the front panel. The top button is called A, and the bottom button is called B.

Let’s begin by creating a simple task to master the button controls. The goal is to display a text icon and a red box with a short press of button A, and display an image with a long press of button A.
2. Write the Program: Button Control — Short Press
Step 1: Find the “when button A pressed” command under the "sensors" category in the UNIHIKER K10 section. Drag it to the code area. This is an interrupt command, meaning the program will jump to it when button A is pressed and execute the following commands.

Note: For more information about the onboard sensor command, refer to the "Knowledge Hub."
Step 2: Find the “cache draw rectangle”, “cache TF card image” command under the "screen" category in the UNIHIKER K10 section. Drag them below the command for when the A key is pressed (as shown in the image below).

Note: For more information about the TF Card, refer to the "Knowledge Hub."
3. Write the program: Button Control — Long Press
STEP 1: Similarly, find the "button A pressed" command under the "Onboard Sensors" category in the UNIHIKER K10 library (as shown in the image below), and drag it into the code area. This command is a judgment command and needs to be used with conditional control statements like "if then".

When implementing the long-press operation, if the button is pressed, we first need to use a variable to record the initial time when the button is pressed.
STEP 2: Create a variable "Initial Time", then drag the "system runtime" command to assign it a value.

Note: The "System Runtime" command uses milliseconds (ms), and 1 second equals 1000 milliseconds.
Next, we need to continuously subtract the "Initial Time" variable from the current time to get the waiting time, and check if the waiting time reaches the preset value (for example, 2 seconds), until the button is released. If the preset value is reached (2 seconds), the corresponding operation (e.g., display an image) will be executed.
STEP 3: Add a repeat execution statement.

STEP 4: Combine the judgment command and place it inside the repeat execution block.

Note: The unit of "system runtime" is milliseconds, so ">2000" means greater than 2000ms, which is 2 seconds.
STEP 5: Add the image command and place the completed block inside the main program’s loop for continuous execution.

At this point, the logic for button long press and short press has been written. The complete program is as follows:

4. Run the Program
STEP 1: Check and ensure that the UNIHIKER K10 board is connected to Mind+, then upload the edited program to the device.


STEP 2: Short press the A key and observe that the song text is displayed on the screen. Long press the A key and observe that the song image is displayed on the screen.

Task 2: Audio Recording and Playback
In Task 2, we will learn how to perform audio recording and playback. We will implement a long press on button A to record audio, and a short press on button B to start or stop playback of the audio.
1. Writing the Program
In Task 1, we have already learned how to implement a long press on a button. To implement long press on button A to record audio, we just need to combine the audio recording command with the long press action block.
STEP 1: In the K10 category, find the "record audio to TF card" command, then drag it and place it below the long press block.

STEP 2: Add text display.

Next, we will learn how to play audio with a short press on button B. The short press implementation here is slightly different from Task 1, and both methods are valid. To use the same button for both starting and stopping playback, we will use a variable to record the current playback status: a value of 0 means not playing, and a value of 1 means playing. By pressing the button, we modify the variable, and then control the playback state based on the value of this variable.
STEP 3: Change the "button A pressed" command to "button B pressed" and add it to the "if () then ()" statement.

STEP 4: Create a variable to record the playback status and add a judgment statement for "if () then () else".

STEP 5: Create astring variable to record the audio file name, "sound.wav".

STEP 6: Add the playback and stop playback commands to the script, and modify the audio file name to the character variable "music".

STEP 7: Add related operations: when the variable is 0, play the music file and change the variable to 1; when the variable is 1, stop the playback and change the variable to 0.

STEP 8: Combine the program. Remember that the two buttons, A and B, should be controlled independently, with the "if" blocks connected, not nested.

At this point, the program is complete, and the full program is as follows:

2. Run the Program
STEP1: Connect the UNIHIKER K10 and upload the program.
STEP2: Long press button A, observe that the green light in the upper right corner is on to start recording, and the green light is off to end the recording; short press button B to play the recording.

Task 3: Play Multiple Audio Files
In this task, we need to implement multiple audio files to play in turn. As shown in the figure below, if we name the three audio files and the corresponding images in numerical order, how should we implement their cyclic playback switching? Think about implementing pressing A to switch songs and pressing B to play the song.

The solution is to use a variable to keep track of the current selected song number. Every time we need to switch the song, we increment the song number by 1. Once the number reaches 3, we loop it back to 1, so that the corresponding audio and image can be selected.
1. Write the Program
STEP 1: Create a variable “ID” to store the current serial number, so as to realise that when you press A key, the serial number will be increased by 1, and when the serial number reaches 3, it will be changed back to 1.

STEP 2: Modify the filenames to ensure that each time a song is switched, the corresponding audio file is played.

The audio playback program is already completed. Next, we will add a display to make the experience more convenient and visually comfortable. Here, we will use a red rectangle (box) to indicate the currently selected song.
STEP 3: Write the text and icon display code and add the red box.

STEP 4: Supplement the logic at the point where the A key is pressed to enable the movement of the red box.

STEP 5: Create a function to refresh the text display, and place the display code written in STEP 3 into this function for easy refreshing.

STEP 6: Drag the created function into the script area to implement the text refresh.

At this point, we have completed the program. The full code is as follows:

2. Run the Program
Click upload to transfer the program to the device, then try pressing the A button to switch songs and the B button to play them. Enjoy your initial portable music player!
Task 4: Implement a Full Music Player
As a complete music player, besides playing songs, it should also support recording! In this final task, we will add the recording feature to create a more realistic music player.
We need to consider how to handle the situation before and after recording. Before recording, there are no audio files, but after recording, we have a file that needs to be added to the playback list for playback.

1. Write the Program
STEP 1: Connect the A button recording function from Task 2 with the main program from Task 3. The control for both buttons will remain independent, so be careful with how they are connected.

STEP 2: The difference is that when recording by long-pressing the A button, we have to name the recorded file according to the number and add a location in the directory for the recorded file.
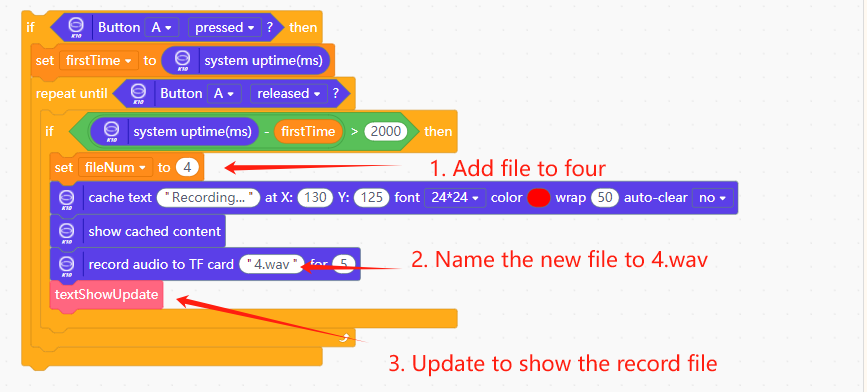
STEP 3: Modify the display function. As the number of files increases, display the recorded files as well. Additionally, add an image named "4.png" to the TF card, which will correspond to the recorded file.

At this point, the program is fully connected. The full code is as follows:

2. Run the Program
Click upload to transfer the program to the device and enjoy testing the full music player with recording functionality!
Knowledge Hub
1. Sensor Commands

2. Introduction to TF Card
The TF card, also known as T-Flash card or micro SD card, is a type of small-sized SD card. TF cards are commonly used as external storage for small digital devices like mobile phones, MP4 players, and other compact electronics.

The following TF cards are recommended for use with the UNIHIKER K10:

3. Audio Record and Playback Commands

Want to turn this retro player into a modern STEM toolkit? The UNIHIKER K10’s TF card slot and audio APIs let students prototype podcast recorders, language learners, or even IoT soundboards.
[Get UNIHIKER K10 AI Educational Tool for Kids]
Want to keep learning? Continue your learning journey with our other lessons.
Lesson1: Build a Light-Responsive Virtual Pet Dog
Lesson2: Design a Whack-a-Mole Arcade Game
Lesson4: Design Smart RFID Unmanned Supermarket
Lesson5: Build IoT Smart Greenhouse Monitoring System
Lesson6: Build a Voice-Controlled Smart Home Assistant
Lesson7: Build a Face Recognition AI Camera for Christmas Projects
Lesson8: Create an AI-Powered Campus Gatekeeper with Facial Recognition
Lesson9: Create an Automatic Cat Feeder with Cat Face Detection


