UNIHIKER K10 Lesson 6: Build a Voice-Controlled Smart Home Assistant

Imagine controlling your home with just your voice - now you can build this futuristic technology yourself using UNIHIKER K10! In this hands-on lesson (perfect for Micro:bit users ready to level up), we'll create a responsive smart assistant that understands commands like 'Turn on the light' and 'Start the fan'. No prior AI knowledge needed - we'll use pre-trained models and beginner-friendly Mind+ software to bring your smart home to life!

Objectives
Using the UNIHIKER K10 to display text and images to simulate a smart assistant, voice recognition and synthesis technology is employed to achieve voice control for turning lights and fans on or off. Specific functional description: Say the wake-up word “Hi Telly” to wake up the voice assistant from sleep mode. After waking up, follow the text prompt to say the corresponding command word, such as “turn on the light”. Once the UNIHIKER K10 successfully recognizes the command, it turns on the light and synthesizes a voice reply saying,"The light has been turned on."

Knowledge Goals
1. Master the relevant commands for voice recognition and voice synthesis.
2. Master the control method for the onboard LED light on the UNIHIKER K10.
3. Master the control method for connecting a fan to the UNIHIKER K10.
Materials List
Hardware List:


Basic Mind+ Software Usage
1. Open Mind+ and switch to offline mode.

2. Load UNIHIKER K10
Based on the previous steps, then click on "Extensions" find the "UNIHIKER K10" module under the "Board" and click to add it. After clicking "Back" you can find the UNIHIKER K10 in the "Command Area" and complete the loading of UNIHIKER K10.

3. Connect UNIHIKER K10
First of all, you need to use a USB cable to connect the UNIHIKER K10 to the computer.

Then, after clicking Connect Device, click COM7-UNIHIKER K10 to connect.
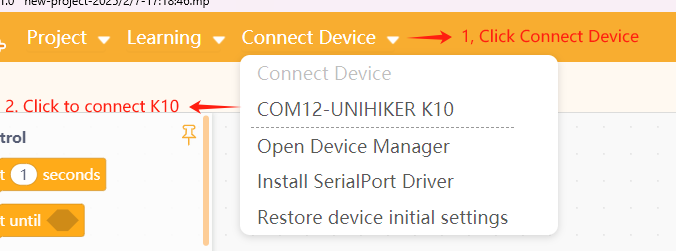
Note: The device name of different UNIHIKER K10 may vary, but all end with K10.
On Windows 10/11, the UNIHIKER K10 is driver-free. However, for Windows 7, manual driver installation is required: https://www.unihiker.com/wiki/K10/faq/#high-frequency-problem
Hands-on Practice
Next, let's get hands-on and complete today's course tasks. We will start with waking up the voice recognition feature, gradually learning how to control the light switch with voice recognition on the UNIHIKER K10, how to synthesize voice responses, and finally add fan control to achieve a complete smart home functionality.
Task 1: Wake Up Voice Recognition
In this section, we will learn how to activate voice recognition functionality.
Task 2: Voice Control for Light Switch
Here, we will learn how to add command words to the voice recognition module to control the switching of lights.
Task 3: Add Fan Control
In this part, we will connect an external actuator—a fan to the UNIHIKER K10 and enable voice control to switch the fan on and off.
Task 1: Wake Up Voice Recognition
To save resources, the voice recognition module enters sleep mode upon startup. Therefore, let's first learn how to initialize and wake up voice recognition.
1. Understand voice recognition
Voice recognition functionality requires two steps: wake-up and recognition. You must first use the wake-up word “Hi Telly” or “Jarvis” to wake up the system, before entering voice command recognition mode. Approximate pronunciations can also wake up the system.
Next, let's complete a simple task to master the startup process of the voice recognition module. The goal is to say the wake-up word, and the screen will display a wake-up prompt and the corresponding image.
2. Write the program
STEP 1: First, find the "set speech recognition" command under the Artificial Intelligence label in the UNIHIKER K10 section (as shown in the picture below), and then drag it to the beginning of the main program. This is an initialization command that switches to the voice recognition module.
The wake-up time refers to the interval in milliseconds (ms) from when the module is awakened to when it enters sleep mode again.

Note: 1s = 1000ms. For a detailed introduction to the voice recognition command, please refer to the Knowledge Hub.
Next, we need to make a judgment when voice recognition is awakened. If it is awakened, we will update the displayed image and text; otherwise, we will show the default text and image.
STEP2: In the UNIHIKER K10 section, find the "speech recognition awake?" command under the Artificial Intelligence label. Drag it after the"if" section of the "If() then() else" statement.

STEP3: Add the statements to display text and images.

Note: For a detailed introduction to TF card commands, please refer to Lesson 3 of the tutorial - K10 Portable Music Player.
STEP4: Combine the program and add it to the main program’s "forever" command to ensure that the wake-up check is continuously performed.

At this point, we have completed the program for voice recognition wake-up. The full program is as follows:

3. Run the Program
STEP1: Check and ensure that the UNIHIKER K10 is connected to Mind+, and upload the edited program to the device.

STEP2: Say “Hi Telly” and observe that the text and image on the screen change.

Task 2: Voice Control for Light Switch
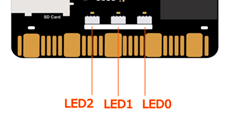
In Task 2, we will learn how to add command words to control the on/off state of the onboard RGB LEDs. There are three RGB LEDs located at the bottom of the back of the main control board. Use their serial numbers to specify which RGB LED to control. The serial numbers and positions of the RGB LEDs are shown in the image below.
1. Write the program
STEP1: In the K10 category, under the Artificial Intelligence label, find the "add voice command id" command. Then drag it to the script area and add the command word turn on the light. The command word should be written in Pinyin, with spaces separating the syllables. It is recommended to use 2-5 syllables.

Note: For a detailed introduction to the command word command, please refer to the Knowledge Hub.
Next, we need to perform a check. When the command word “turn on the light” is detected, perform the related action—turn on the light.
STEP2: In the K10 category, find the "command id 0 detected" command, then drag it into an "if" command.

STEP 3: After detecting the “turn on the light” command word, we need to control the RGB LED to turn on and display an emoji image. In the K10 category, find the LED Control label, and then find the "set led brightness" "turn on led" command. Drag it into the If statement. At the same time, add the relevant image display command.
For the Display Color command, to simplify, change the lamp number to “All (-1)”.

Note: For a detailed introduction to LED control commands, please refer to the Knowledge Garden.
At this point, we have completed adding the “turn on the light” command word.
STEP4: Drag a new Add Command Word command and modify its ID to 1. Following the steps in STEP 2 and STEP 3, add the command word “turn off the light”. Then, drag and add the turn-off light command.

STEP5: Merge with the voice recognition wake-up program from Task 1.
Note: The detection of the two command words and the voice recognition wake-up check are parallel in logic. They should be connected sequentially, not nested within each other.

At this point, the program has been completed. The full program is shown in the figure below.

2. Run the Program
STEP1: Connect the UNIHIKER K10 and upload the program.
STEP2: Say “Hi,Telly” to enter the wake-up state. Say “turn on the light” and observe the LED lights on the back of the K10 board turn on. Say “turn off the light” and observe the lights turn off.

Task 3: Add Fan Control
As a smart home assistant, it should not only control lights but also manage other appliances. In this final task, we will add a DC motor fan to enable voice-controlled fan operation.
1. Hardware Connection
Connect the DC motor fan to the P0 pin of the UNIHIKER K10 using a 3pin connection wire.

Now that the hardware setup is ready, let’s proceed to the programming part to control the fan using voice commands.
2. Write the program
STEP1: Add Command Words. Similar to STEP 2 and STEP 3, add the command words "turn on the fan" and "turn off the fan" to the voice recognition module. Note: Modify the ID numbers to 2 and 3; the command words should be in pinyin form.

STEP2: Add Fan Control commands. The DC motor fan is similar to the LED light. When controlling the fan, set the pin to low level to turn off the fan, and high level to turn on the fan.
Therefore, we need to find the "set P0 mode OUTPUT" command under the Pin Operations tab in the K10 category, and drag it into the script area.
Then, modify the command according to the fan’s on/off behavior, and connect it under the execution statement from STEP1.

STEP3: Add corresponding image and speech synthesis, then integrate with the main program.


At this point, we have completed the program connection. Below is the reference for the complete program.

3. Run the Program
STEP1: Connect the UNIHIKER K10 and upload the program.
STEP2:
Say “Hi Telly” to enter the wake-up state.
Say “Turn on the fan” and observe the following:
• The fan starts spinning.
Say “Turn off the light” and observe the following:
• The fan stops spinning.

Knowledge Hub
1. Voice Recognition commands

2. LED Control commands

Congratulations! You've just built a fully functional voice-controlled smart home system with UNIHIKER K10. This project demonstrates how accessible AI and IoT technology have become for learners.
[Get UNIHIKER K10 here]
Want to keep learning? Continue your learning journey with our other lessons.
Lesson1: Build a Light-Responsive Virtual Pet Dog
Lesson2: Design a Whack-a-Mole Arcade Game
Lesson3: Build Portable Walkman-Style Music Player (KS3/CSTA/DigComp)
Lesson4: Design Smart RFID Unmanned Supermarket
Lesson5: Build IoT Smart Greenhouse Monitoring System
Lesson7: Build a Face Recognition AI Camera for Christmas Projects
Lesson8: Create an AI-Powered Campus Gatekeeper with Facial Recognition
Lesson9: Create an Automatic Cat Feeder with Cat Face Detection


![[Spanish ver.] HuskyLens Cámara Inteligencia Artificial](https://dfimg.dfrobot.com/nobody/makelog/902f49d1d2eb94077e1ba7d8b652cee6_224x164.jpg)


